VM 배포 후 pacemaker 설정
배포판 : SUSE Enterprise Linux for SAP 15 SP1 +24x7 Support

1. root 권한으로 전환(sudo su) 후 환경설정
-
AP #1, AP #2 서버 SSH 접근
- 시스템 업데이트 :
zypper -n update - 타임 존 설정 :
yast Asia / Seoul - Nfs 설치 :
zypper -n install nfs-utils
- 시스템 업데이트 :
2. ISO 마운트 스크립트 생성
[ISO 마운트 참고문서](https://learn.microsoft.com/ko-kr/azure/storage/files/storage-files-quick-create-use-windows)
| No | ISO Mount |
|---|---|
| 1. | 파일공유 스토리지 생성 |
| 2. | 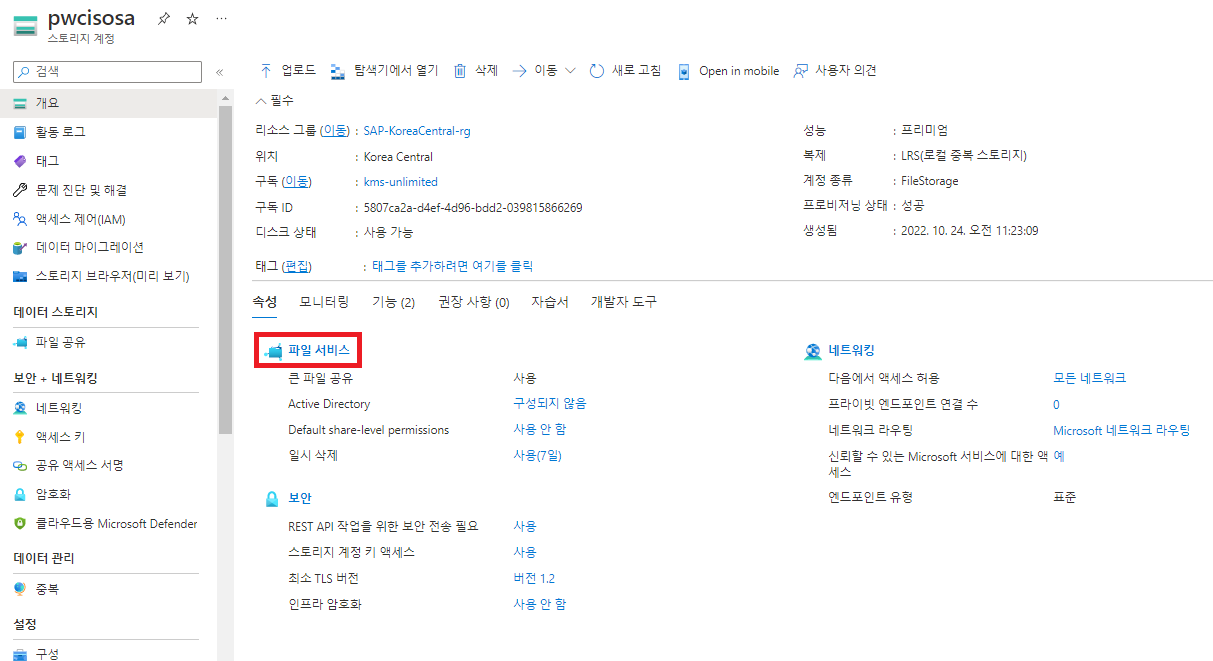 |
| 3. | 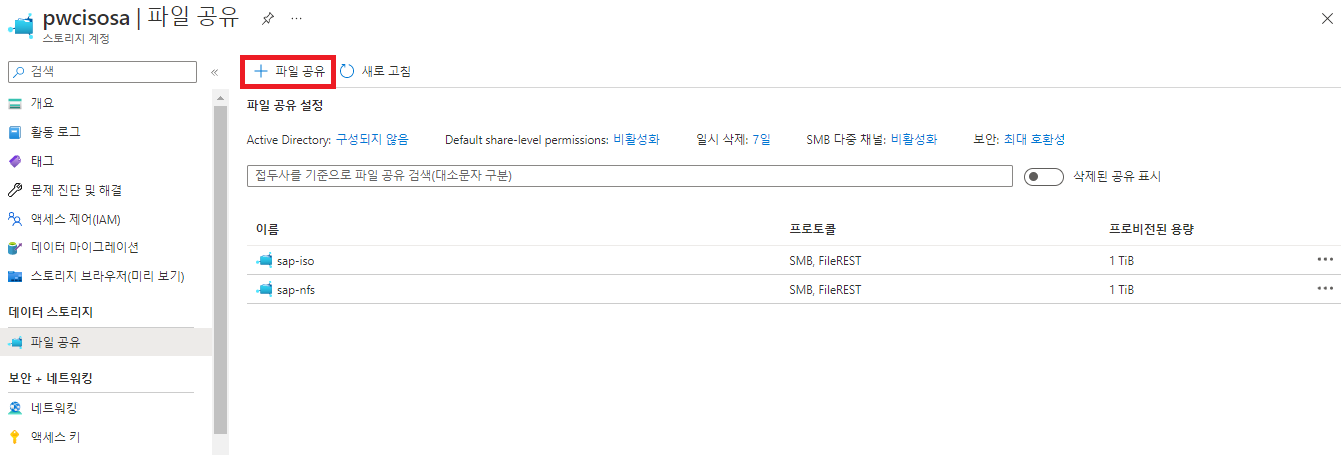 |
| 4. | 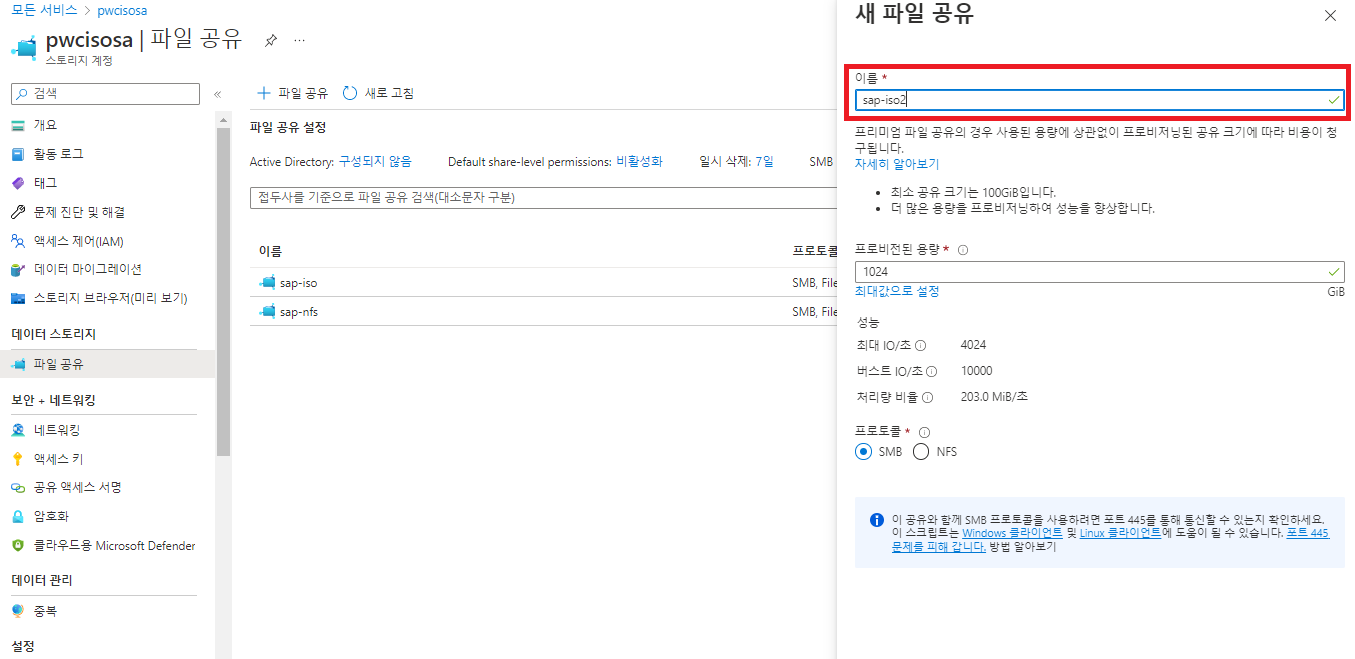 |
| 5. | 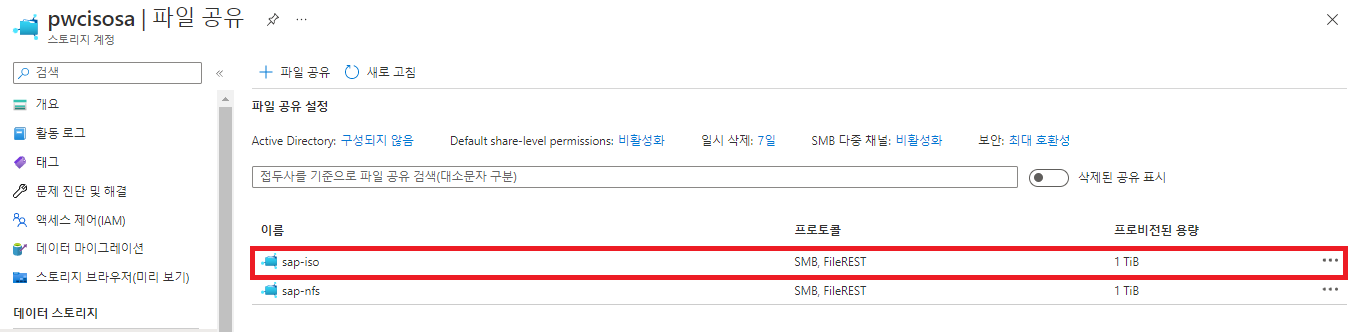 |
| 6. |  |
| 7. | 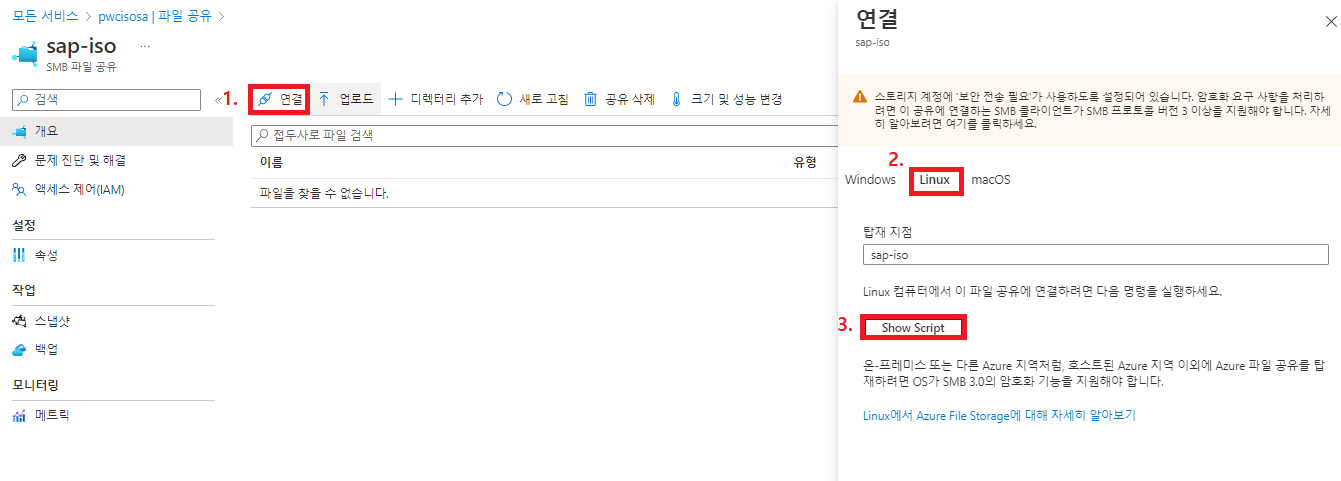 |
| 8. | 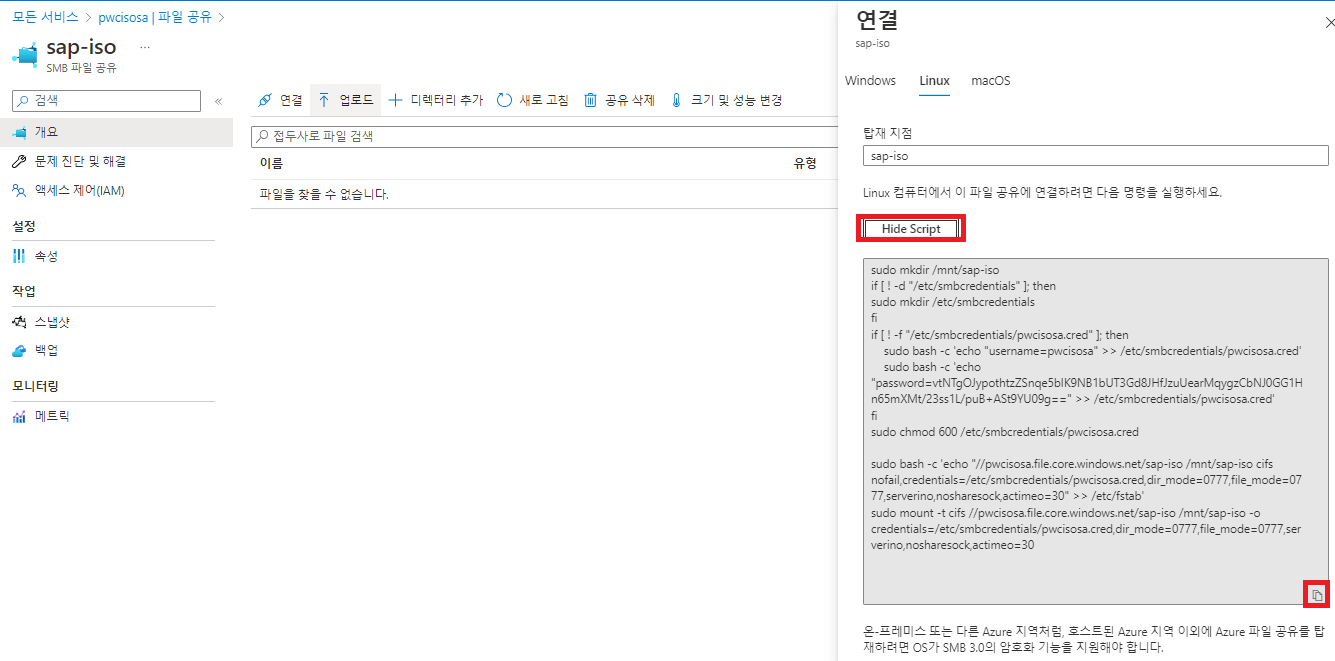 |
- [복사본] 8번에서 복사한 파일공유 스크립트 AP-1, AP-2에 붙여넣기 실행
sudo mkdir /mnt/sap-iso
if [ ! -d "/etc/smbcredentials" ]; then
sudo mkdir /etc/smbcredentials
fi
if [ ! -f "/etc/smbcredentials/pwcisosa.cred" ]; then
    sudo bash -c 'echo "username=pwcisosa" >> /etc/smbcredentials/pwcisosa.cred'
    sudo bash -c 'echo "password=uYpf9yV6nvJKHu3xtw7jNsndv6336IkbCSe//XRhWOX65J3kqGnavtDXvPwh43pTJoe8RYjQQh/Iqo41I82a8Q==" >> /etc/smbcredentials/pwcisosa.cred'
fi
sudo chmod 600 /etc/smbcredentials/pwcisosa.cred
sudo bash -c 'echo "//pwcisosa.file.core.windows.net/sap-iso /mnt/sap-iso cifs nofail,vers=3.0,credentials=/etc/smbcredentials/pwcisosa.cred,dir_mode=0777,file_mode=0777,serverino" >> /etc/fstab'
sudo mount -t cifs //pwcisosa.file.core.windows.net/sap-iso /mnt/sap-iso -o vers=3.0,credentials=/etc/smbcredentials/pwcisosa.cred,dir_mode=0777,file_mode=0777,serverino
- 남부 DR 센터용 Azure file for NFS 마운트 링크참조
krsnfssa.file.core.windows.net:/krsnfssa/shared /hana/shared  nfs   rw,vers=4,minorversion=1,hard,timeo=600,rsize=262144,wsize=262144,intr,noatime,bg,lock,_netdev,sec=sys  0  0
크기 및 성능
사용된 용량	:	0 B
프로비저닝된 용량	:	1 TiB
기준 IO/s	:	1424
버스트 IO/s	:	4000
송신 속도	:	121.4 MiBytes/s
수신 속도	:	81.0 MiBytes/s
krsnfssa.file.core.windows.net:/krsnfssa/sap /usr/sap   nfs   rw,vers=4,minorversion=1,hard,timeo=600,rsize=262144,wsize=262144,intr,noatime,bg,lock,_netdev,sec=sys  0  0
기준 IO/s  :	500
버스트 IO/s  :	4000
송신 속도  :	66.0 MiBytes/s
수신 속도  :	44.0 MiBytes/s
3. ANF 마운트 :
- autofs 설치 명령어 실행
zypper -n install autofs
- 실행창 참고
- AP #1 Server
megazone@AP-1:~> zypper -n install autofs Root privileges are required to run this command. megazone@AP-1:~> sudo su AP-1:/home/megazone # zypper -n install autofs Refreshing service 'Basesystem_Module_x86_64'. Refreshing service 'Containers_Module_x86_64'. Refreshing service 'Desktop_Applications_Module_x86_64'. Refreshing service 'Development_Tools_Module_x86_64'. Refreshing service 'Legacy_Module_x86_64'. Refreshing service 'Public_Cloud_Module_x86_64'. Refreshing service 'Python_2_Module_x86_64'. Refreshing service 'SAP_Applications_Module_x86_64'. Refreshing service 'SUSE_Cloud_Application_Platform_Tools_Module_x86_64'. Refreshing service 'SUSE_Linux_Enterprise_High_Availability_Extension_x86_64'. Refreshing service 'SUSE_Linux_Enterprise_Live_Patching_x86_64'. Refreshing service 'SUSE_Linux_Enterprise_Server_for_SAP_Applications_x86_64'. Refreshing service 'Server_Applications_Module_x86_64'. Refreshing service 'Web_and_Scripting_Module_x86_64'. Building repository 'SLE-Module-Basesystem15-SP1-Pool' cache .................................................[done] Retrieving repository 'SLE-Module-Basesystem15-SP1-Updates' metadata .........................................[done] Building repository 'SLE-Module-Basesystem15-SP1-Updates' cache ..............................................[done] Building repository 'SLE-Module-Containers15-SP1-Pool' cache .................................................[done] Retrieving repository 'SLE-Module-Containers15-SP1-Updates' metadata .................................... - AP #2 Server
megazone@AP2:~> sudo su
AP2:/home/megazone # zypper -n install autofs
Refreshing service 'Basesystem_Module_x86_64'.
Refreshing service 'Containers_Module_x86_64'.
Refreshing service 'Desktop_Applications_Module_x86_64'.
Refreshing service 'Development_Tools_Module_x86_64'.
Refreshing service 'Legacy_Module_x86_64'.
Refreshing service 'Public_Cloud_Module_x86_64'.
Refreshing service 'Python_2_Module_x86_64'.
Refreshing service 'SAP_Applications_Module_x86_64'.
Refreshing service 'SUSE_Cloud_Application_Platform_Tools_Module_x86_64'.
Refreshing service 'SUSE_Linux_Enterprise_High_Availability_Extension_x86_64'.
Refreshing service 'SUSE_Linux_Enterprise_Live_Patching_x86_64'.
Refreshing service 'SUSE_Linux_Enterprise_Server_for_SAP_Applications_x86_64'.
Refreshing service 'Server_Applications_Module_x86_64'.
Refreshing service 'Web_and_Scripting_Module_x86_64'.
Building repository 'SLE-Module-Basesystem15-SP1-Pool' cache .................................................[done]
Retrieving repository 'SLE-Module-Basesystem15-SP1-Updates' metadata .........................................[done]
Building repository 'SLE-Module-Basesystem15-SP1-Updates' cache ..............................................[done]
Building repository 'SLE-Module-Containers15-SP1-Pool' cache .................................................[done]
Retrieving repository 'SLE-Module-Containers15-SP1-Updates' metadata .........................................[done]
Building repository 'SLE-Module-Containers15-SP1-Updates' cache
- AP #1 Server
- [AP #1, AP #2] 디렉토리 생성
mkdir /hana/data, /hana/log, /hana/shared sudo mkdir -p /hana/data, /hana/log, /hana/shared - [AP #1, AP #2] NFS 마운트
sudo mount -t nfs -o rw,hard,rsize=1048576,wsize=1048576,sec=sys,vers=4.1,tcp 10.1.3.4:/data-node01/hana/data sudo mount -t nfs -o rw,hard,rsize=1048576,wsize=1048576,sec=sys,vers=4.1,tcp 10.1.3.4:/log-node01/hana/log sudo mount -t nfs -o rw,hard,rsize=1048576,wsize=1048576,sec=sys,vers=4.1,tcp 10.1.3.4:/log-shared/hana/shared sudo mount -t nfs -o rw,hard,rsize=1048576,wsize=1048576,sec=sys,vers=4.1,tcp 10.1.3.4:/log-shared/usr/sap/ sudo mount -t nfs -o rw,hard,rsize=1048576,wsize=1048576,sec=sys,vers=4.1,tcp 10.1.3.5:/app-shared/ - [AP #1, AP #2] Ifconfig 명령어 패키지 설치
zypper install net-tools-deprecated - 명령어 실행 참고
AP-1:/home/megazone # zypper install net-tools-deprecated
Refreshing service 'Basesystem_Module_x86_64'.
Refreshing service 'Containers_Module_x86_64'.
Refreshing service 'Desktop_Applications_Module_x86_64'.
Refreshing service 'Development_Tools_Module_x86_64'.
Refreshing service 'Legacy_Module_x86_64'.
Refreshing service 'Public_Cloud_Module_x86_64'.
Refreshing service 'Python_2_Module_x86_64'.
Refreshing service 'SAP_Applications_Module_x86_64'.
Refreshing service 'SUSE_Cloud_Application_Platform_Tools_Module_x86_64'.
Refreshing service 'SUSE_Linux_Enterprise_High_Availability_Extension_x86_64'.
Refreshing service 'SUSE_Linux_Enterprise_Live_Patching_x86_64'.
Refreshing service 'SUSE_Linux_Enterprise_Server_for_SAP_Applications_x86_64'.
Refreshing service 'Server_Applications_Module_x86_64'.
Refreshing service 'Web_and_Scripting_Module_x86_64'.
Loading repository data...
Reading installed packages...
Resolving package dependencies...

The following recommended package was automatically selected:
  net-tools-lang

The following 2 NEW packages are going to be installed:
  net-tools-deprecated net-tools-lang

2 new packages to install.
Overall download size: 233.2 KiB. Already cached: 0 B. After the operation, additional 704.4 KiB will be used.
Continue? [y/n/v/...? shows all options] (y): y
Retrieving package net-tools-lang-2.0+git20170221.479bb4a-3.11.noarch                                                              (1/2),  62.9 KiB (244.3 KiB unpacked)
Retrieving: net-tools-lang-2.0+git20170221.479bb4a-3.11.noarch.rpm ...............................................................................................[done]
Retrieving package net-tools-deprecated-2.0+git20170221.479bb4a-3.11.x86_64                                                        (2/2), 170.2 KiB (460.1 KiB unpacked)
Retrieving: net-tools-deprecated-2.0+git20170221.479bb4a-3.11.x86_64.rpm .........................................................................................[done]

Checking for file conflicts: .....................................................................................................................................[done]
(1/2) Installing: net-tools-lang-2.0+git20170221.479bb4a-3.11.noarch .............................................................................................[done]
(2/2) Installing: net-tools-deprecated-2.0+git20170221.479bb4a-3.11.x86_64 .......................................................................................[done]
AP-1:/home/megazone #
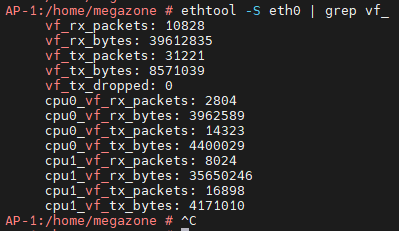
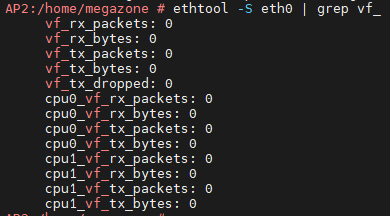
- [AP #1, AP #2] 가속 네트워킹 설정 확인 명령어 실행
ethtool -S eth0 | grep vf_ - 명령어 실행 화면 참고 [AP #1, AP #2 화면 동일]
- AP #1 Server
- AP #2 Server
- AP #1 Server
각 DB 서버의 /etc/hosts 에 추가
client
10.1.2.4	krc-poc-hanandb1971
10.1.2.5	krc-poc-hanandb2972
10.1.2.6	krc-poc-hanandb3340
hana
10.1.21.4	krc-poc-hanandb2100
10.1.21.5	krc-poc-hanandb2172
10.1.21.6	krc-poc-hanandb2140
storage
10.1.22.4	krc-poc-hanandb2200
10.1.22.5	krc-poc-hanandb2272
10.1.22.6	krc-poc-hanandb2240
각 App 서버의 /etc/hosts 에 추가
Client
10.1.1.4	krc-poc-hananap1767
10.1.22.15	krc-poc-hanaap2-storage
Storage
10.1.22.14	krc-poc-hanaap1-storage
10.1.22.15	krc-poc-hanaap2-storage
NIC 설정
호스트네임 변경 중지
HANA DB :  vi /etc/sysconfig/network/ifcfg-eth2
HANA AP :  vi /etc/sysconfig/network/ifcfg-eth1
ANF 경로 설정 : vi /etc/sysconfig/network/ifroute-eth1
 # Add the following routes
 # RouterIPforStorageNetwork - - -
 # ANFNetwork/cidr RouterIPforStorageNetwork - -
 10.23.2.1 - - -
 10.23.1.0/26 10.23.2.1 - -

 # ANF : 10.1.3.0/24
!! Shared 볼륨을 /mnt/tmp 로 마운트 후 shared / hana-db1 / hana-db2 / hana-db3 디렉터리 생성 하여 /usr/sap/EDB 에서 마운트 사용
Create a temporary directory to mount shared
mkdir /mnt/tmp
if using NFSv3 for this volume, mount with the following command
mount 10.1.3.4:/log-shared /mnt/tmp
if using NFSv4.1 for this volume, mount with the following command
 mount -t nfs -o sec=sys,vers=4.1 10.1.3.4:/log-shared /mnt/tmp
 cd /mnt/tmp
 mkdir shared usr-sap-hanadb1 usr-sap-hanadb2 usr-sap-hanadb3
unmount /hana/shared
 cd
 umount /mnt/tmp
Client
10.1.1.4	krc-poc-hananap1767
10.1.22.15	krc-poc-hanaap2-storage
Storage
10.1.22.14	krc-poc-hanaap1-storage
10.1.22.15	krc-poc-hanaap2-storage
마운팅 정보
HANA DB1
# vi /etc/fstab
Add the following entries
10.1.3.4:/data-node01   /hana/data/EDB/mnt00001 nfs   rw,vers=4,minorversion=1,hard,timeo=600,rsize=262144,wsize=262144,intr,noatime,bg,lock,_netdev,sec=sys  0  0
10.1.3.4:/log-node01    /hana/log/EDB/mnt00001  nfs   rw,vers=4,minorversion=1,hard,timeo=600,rsize=262144,wsize=262144,intr,noatime,bg,lock,_netdev,sec=sys  0  0
10.1.3.4:/data-node02   /hana/data/EDB/mnt00002 nfs   rw,vers=4,minorversion=1,hard,timeo=600,rsize=262144,wsize=262144,intr,noatime,bg,lock,_netdev,sec=sys  0  0
10.1.3.4:/log-node02    /hana/log/EDB/mnt00002  nfs   rw,vers=4,minorversion=1,hard,timeo=600,rsize=262144,wsize=262144,intr,noatime,bg,lock,_netdev,sec=sys  0  0
10.1.3.4:/log-shared/shared     /hana/shared  nfs   rw,vers=4,minorversion=1,hard,timeo=600,rsize=262144,wsize=262144,intr,noatime,bg,nolock,_netdev,sec=sys  0  0
10.1.3.4:/log-shared/usr-sap-hanadb3    /usr/sap/EDB  nfs   rw,vers=4,minorversion=1,hard,timeo=600,rsize=262144,wsize=262144,intr,noatime,bg,nolock,_netdev,sec=sys  0  0
HANA DB2
# vi /etc/fstab

# Add the following entries
10.1.3.4:/data-node01   /hana/data/EDB/mnt00001 nfs   rw,vers=4,minorversion=1,hard,timeo=600,rsize=262144,wsize=262144,intr,noatime,bg,lock,_netdev,sec=sys  0  0
10.1.3.4:/log-node01    /hana/log/EDB/mnt00001  nfs   rw,vers=4,minorversion=1,hard,timeo=600,rsize=262144,wsize=262144,intr,noatime,bg,lock,_netdev,sec=sys  0  0
10.1.3.4:/data-node02   /hana/data/EDB/mnt00002 nfs   rw,vers=4,minorversion=1,hard,timeo=600,rsize=262144,wsize=262144,intr,noatime,bg,lock,_netdev,sec=sys  0  0
10.1.3.4:/log-node02    /hana/log/EDB/mnt00002  nfs   rw,vers=4,minorversion=1,hard,timeo=600,rsize=262144,wsize=262144,intr,noatime,bg,lock,_netdev,sec=sys  0  0
10.1.3.4:/log-shared/shared     /hana/shared  nfs   rw,vers=4,minorversion=1,hard,timeo=600,rsize=262144,wsize=262144,intr,noatime,bg,nolock,_netdev,sec=sys  0  0
10.1.3.4:/log-shared/usr-sap-hanadb3    /usr/sap/EDB  nfs   rw,vers=4,minorversion=1,hard,timeo=600,rsize=262144,wsize=262144,intr,noatime,bg,nolock,_netdev,sec=sys  0  0
HANA DB3
# vi /etc/fstab
# Add the following entries
10.1.3.4:/log-shared/shared /hana/shared nfs rw,vers=4,minorversion=1,hard,timeo=600,rsize=1048576,wsize=1048576,intr,noatime,lock,_netdev,sec=sys 0 0
10.1.3.4:/log-shared/usr-sap-hanadb3 /usr/sap/EDB nfs rw,vers=4,minorversion=1,hard,timeo=600,rsize=1048576,wsize=1048576,intr,noatime,lock,_netdev,sec=sys 0 0
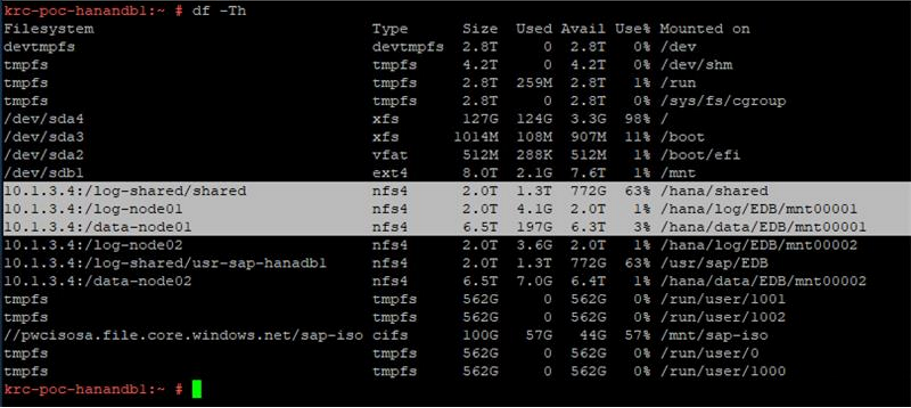
krc-poc-hanandb1:/ # df -h
10.1.3.4:/log-shared/usr-sap-hanadb3 2.0T 729G 1.3T 36% /usr/sap/EDB
10.1.3.4:/data-node02 6.5T 6.9G 6.4T 1% /hana/data/EDB/mnt00002
10.1.3.4:/log-node02 2.0T 6.5G 2.0T 1% /hana/log/EDB/mnt00002
10.1.3.4:/log-shared/shared 2.0T 729G 1.3T 36% /hana/shared
10.1.3.4:/log-node01 2.0T 7.1G 2.0T 1% /hana/log/EDB/mnt00001
10.1.3.4:/data-node01 6.5T 210G 6.2T 4% /hana/data/EDB/mnt00001
HANA APP 마운팅
# if using NFSv4.1 for this volume, mount with the following command
mount -t nfs -o sec=sys,vers=4.1 10.1.3.5:/app-shared /mnt/tmp
cd /mnt/tmp
mkdir sapmnt trans EAP

# unmount /hana/shared
cd
umount /mnt/tmp
HANA AP 1& 2
# vi /etc/fstab
# Add the following entries
10.1.3.5:/app-shared/sapmnt	/sapmnt/EAP  nfs   rw,vers=4,minorversion=1,hard,timeo=600,rsize=1048576,wsize=1048576,intr,noatime,lock,_netdev,sec=sys  0  0
10.1.3.5:/app-shared/trans   /usr/sap/trans  nfs   rw,vers=4,minorversion=1,hard,timeo=600,rsize=1048576,wsize=1048576,intr,noatime,lock,_netdev,sec=sys  0  0
10.1.3.5:/app-shared/EAP	/usr/sap/EAP  nfs   rw,vers=4,minorversion=1,hard,timeo=600,rsize=1048576,wsize=1048576,intr,noatime,lock,_netdev,sec=sys  0  0

10.1.3.5:/app-shared/sapmnt               1.0T  7.1G 1017G   1% /sapmnt/EAP
10.1.3.5:/app-shared/EAP                  1.0T  7.1G 1017G   1% /usr/sap/EAP
10.1.3.5:/app-shared/trans                1.0T  7.1G 1017G   1% /usr/sap/trans
Pacemaker SBD 설치
Fence agent
https://docs.microsoft.com/ko-kr/azure/virtual-machines/workloads/sap/high-availability-guide-suse-pacemaker#a-assign-the-custom-role-to-the-service-principal
- App 등록 : 테넌트 관리 계정으로 A-AD 에서 App 등록
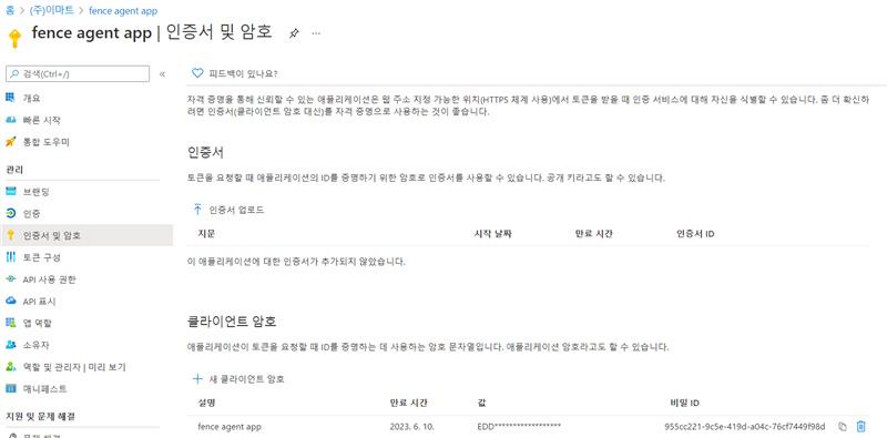
- 사용자 지정 권한 json 으로 등록
- 구독 / 리소스 그룹에서 IAM 에서 기여자 / fence agent app 으로 권한 등록
[! TIP] Azure Fence Agent에는 표준 ILB를 사용하는 VM에 대한 공용 끝점 연결에 가능한 솔루션과 함께 문서화 된 공용 끝점에 대한 아웃 바운드 연결이 필요합니다 .

!! Fence agent 설치 작업 시 오류 발생
해결 방법 : python3 버전 다운 그레이드
krc-poc-ap1:~ # zypper in --oldpackage python3-azure-mgmt-compute=4.6.2-6.3.1
Refreshing service 'Basesystem_Module_x86_64'.
Refreshing service 'Containers_Module_x86_64'.
Refreshing service 'Desktop_Applications_Module_x86_64'.
Refreshing service 'Development_Tools_Module_x86_64'.
Refreshing service 'Legacy_Module_x86_64'.
Refreshing service 'Public_Cloud_Module_x86_64'.
Refreshing service 'Python_2_Module_x86_64'.
Refreshing service 'SAP_Applications_Module_x86_64'.
Refreshing service 'SUSE_Cloud_Application_Platform_Tools_Module_x86_64'.
Refreshing service 'SUSE_Linux_Enterprise_High_Availability_Extension_x86_64'.
Refreshing service 'SUSE_Linux_Enterprise_Live_Patching_x86_64'.
Refreshing service 'SUSE_Linux_Enterprise_Server_for_SAP_Applications_x86_64'.
Refreshing service 'Server_Applications_Module_x86_64'.
Refreshing service 'Web_and_Scripting_Module_x86_64'.
Loading repository data...
Reading installed packages...
Resolving package dependencies...

Problem: azure-cli-2.14.2-6.4.1.noarch requires python3-azure-mgmt-compute >= 14.0, but this requirement cannot be provided
 Solution 1: downgrade of azure-cli-2.14.2-6.4.1.noarch to azure-cli-2.0.45-4.22.noarch
 Solution 2: do not install python3-azure-mgmt-compute-4.6.2-6.3.1.noarch
 Solution 3: break azure-cli-2.14.2-6.4.1.noarch by ignoring some of its dependencies

Choose from above solutions by number or cancel [1/2/3/c/d/?] (c):  1
Resolving dependencies...
Resolving package dependencies...

The following 43 NEW packages are going to be installed:
  azure-cli-acr azure-cli-acs azure-cli-advisor azure-cli-ams
  azure-cli-appservice azure-cli-backup azure-cli-batch azure-cli-batchai
  azure-cli-billing azure-cli-cdn azure-cli-cloud azure-cli-cognitiveservices
  azure-cli-component azure-cli-configure azure-cli-consumption
  azure-cli-container azure-cli-cosmosdb azure-cli-dla azure-cli-dls
  azure-cli-dms azure-cli-eventgrid azure-cli-eventhubs azure-cli-extension
  azure-cli-feedback azure-cli-find azure-cli-interactive azure-cli-iot
  azure-cli-keyvault azure-cli-lab azure-cli-monitor azure-cli-network
  azure-cli-profile azure-cli-rdbms azure-cli-redis azure-cli-reservations
  azure-cli-resource azure-cli-role azure-cli-search azure-cli-servicebus
  azure-cli-servicefabric azure-cli-sql azure-cli-storage azure-cli-vm

The following 2 packages are going to be downgraded:
  azure-cli python3-azure-mgmt-compute

2 packages to downgrade, 43 new.
Overall download size: 3.5 MiB. Already cached: 0 B. After the operation, 36.7
MiB will be freed.
Continue? [y/n/v/...? shows all options] (y): y
가용성 가이드 표준 로드 밸런서 아웃 바운드 연결
옵션 1 : 인터넷에 대한 아웃 바운드 연결을위한 추가 외부 Azure Standard Load Balancer
공용 끝점에서 VM으로의 인바운드 연결을 허용하지 않고
공용 끝점에 대한 아웃 바운드 연결을 달성하는 한 가지 옵션은
공용 IP 주소로 두 번째 부하 분산기를 만들고
두 번째 부하 분산기의 백 엔드 풀에 VM을 추가하고 아웃 바운드 규칙 . 네트워크 보안 그룹 을
사용 하여
VM의 아웃 바운드 호출에 액세스 할 수있는 공용 끝점을 제어합니다.
자세한 내용은 아웃 바운드 연결 문서의 시나리오 2를 참조하십시오.
구성은 다음과 같습니다. 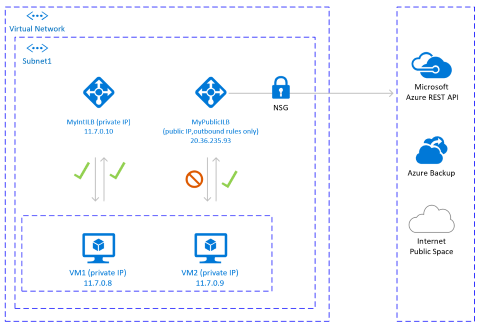
중요한 고려 사항
• 동일한 서브넷의 여러 VM에 대해 하나의 추가 공용로드 밸런서를 사용하여 공용 끝점에 대한 아웃 바운드 연결을 달성하고 비용을 최적화 할 수 있습니다.

• 네트워크 보안 그룹 을 사용 하여 VM에서 액세스 할 수있는 공용 끝점을 제어합니다. 네트워크 보안 그룹을 서브넷 또는 각 VM에 할당 할 수 있습니다. 가능한 경우 서비스 태그 를 사용 하여 보안 규칙의 복잡성을 줄이십시오.

• 공용 IP 주소 및 아웃 바운드 규칙이있는 Azure 표준 부하 분산 장치를 사용하면 공용 끝점에 직접 액세스 할 수 있습니다. 감사 및 로깅을 위해 모든 아웃 바운드 트래픽이 중앙 집중식 회사 솔루션을 통해 전달되도록하는 회사 보안 요구 사항이있는 경우이 시나리오에서는 요구 사항을 충족하지 못할 수 있습니다.
[! TIP] 가능하면 서비스 태그 를 사용 하여 네트워크 보안 그룹의 복잡성을 줄이십시오.